As the core material for tile installation, the consistency of tile adhesive directly determines construction convenience, bonding strength, and long-term durability. Excessively thin consistency may cause tile slippage and hollow spots, while excessively dry consistency leads to uneven application, reduced bonding strength, and even tile detachment. However, the “ideal consistency” is not a fixed value; it requires flexible adjustment based on factors like tile type, substrate condition, and installation method. This article examines the core factors influencing consistency, clarifies appropriate standards for different scenarios, and provides practical judgment methods and adjustment techniques to help installers precisely control adhesive state.
I. First Understand the “Principles”: 3 Core Factors Affecting Tile Adhesive Consistency
The consistency of tile adhesive fundamentally represents a “balance between paste flowability and stability,” primarily determined by three key factors: material composition, application requirements, and environmental conditions. Understanding these factors forms the basis for assessing whether the consistency is appropriate.
1. Material Ratio: The “Golden Ratio” of Water to Dry Powder
Commercially available tile adhesives are typically pre-mixed dry powders (blended from cement, quartz sand, water-retaining agents, binders, etc.). The key factor affecting consistency is the amount of water added—strictly adhering to the water-to-powder ratio specified in the product instructions is essential for controlling consistency.
Typically, the water-to-powder ratio for tile adhesives is 15%-20% of the dry powder weight (e.g., 3-4kg water for 20kg dry powder). Always refer to the product label for precise instructions, as water requirements vary between brands due to differences in water-retention agent content and sand gradation.
Deviating from these ratios disrupts the consistency balance: - Excessive water (over 20%) dilutes the cementitious materials, resulting in overly thin paste with reduced water retention and increased tile slippage. - Insufficient water (below 15%) prevents complete dissolution of the dry powder, creating a “dry sand-like” paste that crumbles during application and lacks adhesion.
2. Tile Type: “Water Absorption Rate” Determines Consistency Requirements
The varying water absorption rates of different tiles directly impact the optimal consistency of the adhesive. Tiles with high water absorption require a “slightly thicker” adhesive (to prevent rapid moisture absorption that could cause bonding failure), while tiles with low water absorption require a “slightly thinner” adhesive (to ensure sufficient slurry flow for filling pores on the tile's back surface).
High-water-absorption tiles (e.g., terracotta, antique-style tiles, water absorption ≥3%): Adhesive should be thicker to ensure the paste adheres firmly before the tile absorbs water and to prevent cracking due to rapid moisture loss.
Low-water-absorption tiles (e.g., porcelain tiles, marble-effect tiles, water absorption ≤0.5%): The adhesive should be thinner (but not runny), utilizing its good flowability to fill the tiny pores on the tile's back surface, thereby increasing the bonding area.
Large-format tiles (e.g., floor tiles ≥600mm×600mm, stone slabs): Due to their significant self-weight, the adhesive should have moderate viscosity and strong water retention to prevent tile displacement after installation caused by mortar flow.
3. Construction Scenario: Compatibility Between Substrate and Installation Method
The flatness of the substrate and the installation method (thin-bed / thick-bed) also influence viscosity selection, requiring flexible adjustments based on actual conditions:
Poor substrate flatness (e.g., wall surface deviation ≥5mm): Use the “thick-bed method” (adhesive application thickness ≥10mm). In this case, slightly higher viscosity is needed to prevent the mortar from flowing due to excessive thickness.
Good substrate flatness (deviation ≤3mm): Typically employs the “thin-bed method” (adhesive spread thickness 3-5mm). Slightly lower consistency is required to ensure easy spreading and formation of uniform sawtooth patterns (enhancing bonding strength).
Vertical wall installations (e.g., kitchen/bathroom wall tiles): Consistency must be sufficiently thick (“paste-like” without flow) to prevent tiles from sliding downward due to gravity after placement.
Horizontal floor installations (e.g., living room floor tiles): Consistency may be slightly lower (while maintaining shape retention) to facilitate even application with a notched trowel and minimize air bubble formation.
II. Redefining “Standards”: Optimal Consistency and Assessment Methods for Different Scenarios
There is no universal numerical standard for “appropriate consistency,” but clear criteria can be established through “visual inspection + practical testing.” Below are descriptions of suitable consistency levels and assessment methods for different scenarios, which construction personnel can directly reference.
1. General Basic Standard: “No flow when applied as a paste, no resistance when scraped on.”
Regardless of the application scenario, the base consistency of tile adhesive must meet the following two core characteristics, which serve as the “minimum standard” for evaluation:
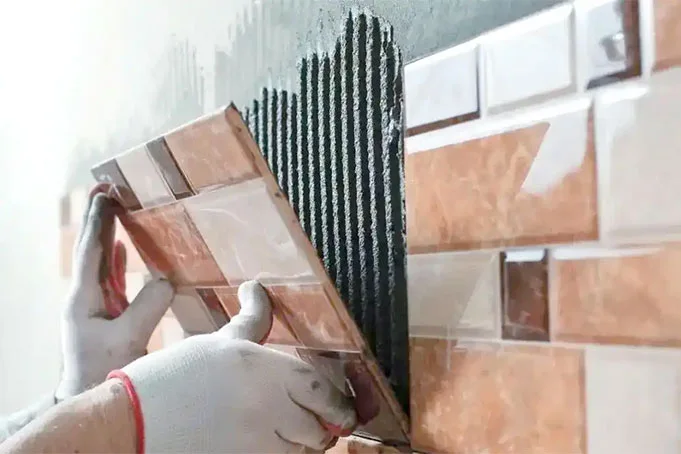
Visual Characteristics: After mixing, the adhesive should form a uniform paste with no dry powder particles or separation of water. After resting for 5 minutes (allowing the water-retaining agent to fully activate), no significant water separation should be visible on the surface. When tilting the container, the paste should neither flow out nor collapse.
Practical Characteristics: When a small amount is picked up with a trowel, it should adhere easily without dripping. Upon application to the substrate, it should spread smoothly without any “sticking sensation.” When troweled with a notched trowel (typically 6mm or 8mm notch spacing), it should form clear, continuous sawtooth patterns (with no noticeable collapse at the peaks and no breaks at the base).
2. Scenario-Specific Standardization: Precise Matching from Tiles to Installation
Beyond the baseline standards, viscosity must be further adjusted based on specific scenarios. Below are detailed standards for four typical scenarios:
| Scene Type | Characteristics of Suitable Consistency | Key Decision Point |
| High Water Absorption Rate Tiles (Terracotta Tiles) | The paste is thick and viscous, showing no flow when stirred. When lifted with a trowel, it forms a “lumpy drip” (does not drip). | After scraping, the serrated stripes maintain their sharp shape. After standing for 10 minutes, the stripes show no significant collapse. |
| Low Water Absorption Rate Tiles (Porcelain Tiles) | The paste is slightly thin, exhibiting slight fluidity when stirred (but not flowing). When lifted with a trowel, it forms a “ribbon that slowly drips down.” | After troweling, the top of the sawtooth pattern is slightly rounded, allowing the mortar to naturally fill the minute pores on the tile's back surface, with no hollow sound. |
| Vertical Wall Tiling (Wall Tiles) | High viscosity, presenting a “paste-like consistency”; requires moderate pressure when applying with a trowel, and the mortar does not run down the wall. | After laying the tiles, gently push them without noticeable slippage. The amount of adhesive squeezed out from the tile edges should be uniform (neither excessive nor insufficient). |
| Large-format tiles / stone slabs (≥800mm) | Moderately thick with strong water retention, the mortar exhibits “toughness” and resists compaction and deformation under tile weight. | Apply a layer ≥8mm thick. After laying the tiles, tap them with a rubber mallet to ensure the adhesive spreads evenly without any localized voids. |
3. Typical Manifestations and Hazards of Error Thickness
If the consistency is improper, noticeable abnormalities will occur during construction, requiring timely adjustment to prevent future issues. Below are manifestations and hazards of two types of incorrect consistency:
Too thin consistency: The mortar appears “thin and watery,” easily foams during mixing, and separates into layers when left to stand (water on top, sand below); During application, the trowel cannot hold the mortar, and after spreading, no sawtooth pattern forms (the surface lies flat). After tile installation, tiles may slowly shift (especially on walls). After 24 hours, tapping the tiles may reveal large areas of hollow sound, increasing the risk of future detachment.
Excessively dry consistency: The mortar resembles “dry sand clumps,” with visible powdery particles during mixing that prevent uniform paste formation. The trowel easily “sticks” during application, leaving scratches and missed areas on the substrate. After tile installation, gaps form between tiles and adhesive, resulting in insufficient bonding strength. This makes tiles prone to cracking and detachment during freeze-thaw cycles in winter.
III. Practical “Techniques”: Methods for Adjusting Consistency and Construction Precautions
Even when mixing with the specified amount of water, consistency variations may occur due to factors such as ambient temperature and material batches, requiring flexible adjustment techniques. Additionally, operational details during application can affect consistency stability and must be monitored simultaneously.
1. Consistency Adjustment: “Make small adjustments in multiple passes, working in the opposite direction.”
If the consistency of the mixed adhesive does not meet requirements, follow the “small amounts, multiple times” principle for adjustment. Avoid adding too much or too little water at once, which may cause irreversible issues:
Adjusting for Excessive Thinness: Do not directly add dry powder (prone to forming lumps and uneven mixing). First, pour the excessively thin paste into a clean container. Then, slowly add a small amount of dry powder (50-100g per addition) while continuously stirring with an electric mixer (recommended at low speed to avoid damaging the paste structure) until it reaches a “paste-like consistency without running.”
Adjusting Overly Dry Mixture: Do not add water directly (this may cause localized thinning). First break up the hardened mixture. Then use a spray bottle (or small watering can) to evenly mist water onto the surface (add 50-100ml per application). Let sit for 2 minutes to allow water absorption, then stir thoroughly with a mixer. Repeat until desired consistency is achieved.
2. Mixing technique: “Add liquid first, then dry ingredients, and mix at low speed.”
Proper mixing ensures uniform consistency and prevents issues like “localized thinness or dryness.” Follow these steps:
Prepare a clean container (avoid residues of cement or grease that may affect bonding strength). Add the specified amount of water as per the instructions.
Slowly pour the dry tile adhesive powder into the water (do not add powder before water, as this may cause lumps). Simultaneously stir with an electric mixer (speed 100-200 rpm).
After adding all powder, continue mixing for 3-5 minutes until the paste is uniform and free of lumps.
Once mixing is complete, let the mixture rest for 5-10 minutes (the “curing” process allows the water-retaining agent to fully absorb water and expand). Stir again for 1 minute before use. The cured paste has more stable viscosity and superior water retention.
3. Construction Precautions: “Use immediately after mixing; control the time.”
The consistency will change over time as moisture evaporates, causing the adhesive to dry out. During application, control the working time to prevent bonding quality issues due to consistency failure:
The mixed adhesive must be used within its “working time” (typically 1-2 hours, refer to product instructions for specifics; reduce to 1 hour in high-temperature environments). After this period, even adding water to adjust consistency will reduce bonding strength as the cementitious materials have begun hydration.
During installation, if the adhesive has dried on the substrate (appearing “grayish-white” and non-tacky), immediately scrape it off and reapply. Do not attempt to “re-soften” hardened adhesive by adding water directly.
When working in winter temperatures ≤5°C (41°F), mix the adhesive with warm water (20-30°C/68-86°F) to avoid cold water inhibiting cement hydration. The consistency may be slightly thinner to ensure slurry flowability while extending workability time.
IV. Common Misconceptions: Two Commonly Made Consistency Judgment Errors and Their Corrections
During construction, many rely on “experience” to judge consistency, yet fall into common pitfalls that lead to quality issues later on. Here are two typical misconceptions and their corrections:
Misconception 1: “The thicker the mixture, the stronger it is, so I intentionally add less water.”
Some construction workers mistakenly believe that “higher viscosity equals stronger adhesion,” intentionally reducing water content to achieve a “dry sand-like” consistency in the adhesive. In reality, excessively dry adhesive fails to adequately fill the pores on the tile's back surface, significantly reducing bonding area and compromising strength. Additionally, the hardened paste is prone to shrinkage cracks, which may lead to hollow spots under vibration (e.g., foot traffic) over time.
Corrective Measures: Use “easily spreadable without running” as the standard, not “the thicker the better.” If bonding strength is a concern, select a higher-grade tile adhesive (e.g., C2TES1 grade, suitable for heavy tiles and stone slabs) instead of increasing viscosity by reducing water content.
Misconception 2: “If you can lift it with chopsticks without it falling off, it's the right size.”
Some use the “chopstick lift test” to judge consistency, believing that “if the paste doesn't drip off after lifting, it's just right.” However, this method overlooks differences in application scenarios—wall tiling requires a consistency that “doesn't drip,” while applying thin-set mortar on floors using this standard would result in excessively dry paste and uneven application.
Corrective Approach: Select testing methods based on application scenarios: - Walls: “Trowel Flip Test” (inverted trowel with no mortar dripping) - Floors: “Notched Trowel Test” (clear, non-collapsing ridges after application) Avoid relying solely on the “chopstick test.”
To learn about our cellulose ether products in tile adhesives, please visit our tile adhesive page.
V. Summary: The “Core Mnemonic” for Consistency Assessment
Determining tile adhesive consistency can be summarized by the core mantra: “Check, Observe, Test.” Construction personnel can directly apply this method:
“Check” the instructions: First verify the product's water-to-powder ratio. Strictly adhere to the specified proportions without arbitrary adjustments.
“Second, observe” the paste consistency: Ensure it forms a uniform paste (free of lumps or water separation) that does not flow when the container is tilted.
“Third, test” the application results: Test spreading (smooth application with clear lines), test bonding (tiles remain stable without slipping or voids), and test time (use within 1-2 hours).
In short, “proper consistency” is the balanced state where the material is workable, provides secure adhesion, and remains effective over time. It requires flexible adjustment based on material properties, tile type, and application conditions—not rigid pursuit of fixed ‘hardness’ or “thinness.” Only precise control of consistency ensures tile installation durability and longevity, avoiding costly rework later.
Posted by Melacollleave words
Hi, I'm Ella, I have been engaged in the cellulose ether industry for 12 years.

Leave a Reply